Today’s blog will explore how to correct your client and instruct the Lat Pull Down technique. This is for you if you are a trainee/newly qualified FITPRO, or confused and overwhelmed about improving client performance.
Watch the 8-minute video to reveal the correct technique, then test your knowledge with three mock questions.
Understanding and knowing the correct lat pull down technique is crucial for 3 reasons:
- Knowing the ins and out’s of the lat pull down technique will benefit you for your level 2 or level 3 anatomy and physiology exam.
- This exercise may be selected in your final practical assessment both at level 2 fitness instructor and level 3 personal trainer. So knowing the ins and outs are a must!
- Most importantly… when you work with clients once qualified. The advice below could supercharge your client’s performance and results.
Watch: Lat Pull Down Technique – How to correct a client
and take notes as you go through today’s Lat Pull Down technique tutorial making this complex topic, super simple

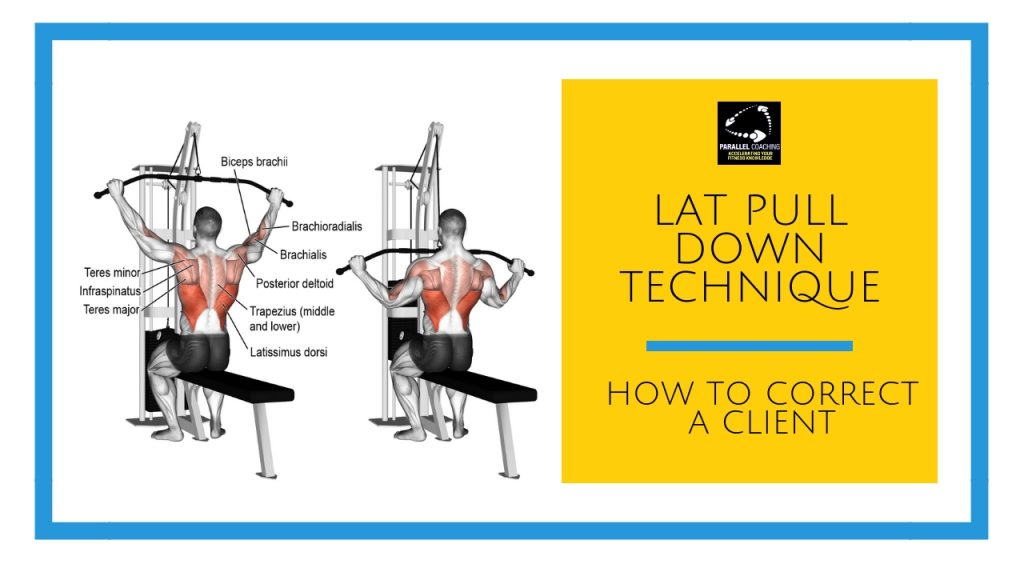
Anatomical Breakdown of the Lat Pull Down technique
The lat pull down is a compound exercise meaning more than one joint is moving. During the concentric and eccentric phase, the shoulder, elbow and wrist move.
The lat pull down is designed to target many muscles of the back, most notably the latissimus dorsi or lats for short. The latissimus dorsi is the prime mover or agonist muscle. Meaning the Latissimus dorsi brings about the movement in the first place. The antagonist or opposing muscle to the latissimus dorsi is the deltoids. Whilst the latissimus dorsi is contracting the deltoids are lengthening and relaxing.
The primary joint actions that occur during the lat pull down are listed below however, it is important to note that accessory joint motions occur depending on how the individual performs the exercise.
During the Concentric Phase (pulling bar towards the chest)
- Shoulder adduction
- Elbow flexion
- Scapulae retraction
During the Eccentric Phase (returning to the start position)
- Shoulder abduction
- Elbow extension
- Scapulae protraction
Lat Pull Down Targeted Muscles


Lat Pull Down Technique: Common Errors
Pulling the Bar Behind Your Neck
Performing behind-the-neck lat pull downs is a controversial exercise and one that should be avoided. While behind-the-neck pull downs can effectively target the latissimus dorsi, the pros do not outweigh the cons.
The same or greater levels of muscle activation occurs with front-of-the-neck lat pull downs, in addition to the body maintaining better posture and joint alignment. Behind-the-neck-pull downs require the individual to poke their head forward to provide a clear path for the bar towards the base of the neck.
A forward head posture can promote muscular tightness of several large neck muscles (i.e., sternocleidomastoid, levator scapulae, scalenes). In addition, a behind-the-neck lat pull down may cause greater stress to the shoulder capsule and ligaments. Some research this exercise may even cause greater risk to the rotator cuff musculature. This may be due to excessive external rotation of the shoulder when performing this exercise.
Individuals should aim to perform all resistance training exercises with a neutral cervical spine posture.
Pulling the Bar to the Waist Line
Another mistake that usually occurs is when people pull the bar to their lower rib or waist area.
The problem with this move is that the lat muscles are not engaged, but the arm muscles are. On top of that, going below the clavicle will put extra stress on the shoulder muscles and more notable the rotator cuffs. In my opinion, this is the most common mistake. So, pay attention to move the bar to the top of your chest.
Too Wide Hand Grip
Since most of the bars are rather wide, people think the wider they grip it, the better.
However, the bar is wide because it must be suitable for everyone in the gym. There are a few reasons why too wide grip is a mistake. The first is that it will reduce the range of motion for the latissimus dorsi, meaning the muscles are not engaged and stimulated. Finally, this wide grip can also place further stress on the shoulder muscles as the shoulder joint is in an unnatural position.
What Are The Key Teaching Points To Look Out For?
- Get your hips below the pulley point
- Pull the bar to the clavicle and no lower
- Keep the body aligned, focusing on the natural c-spine curve.
- Choose a grip just over shoulder-width apart
- Avoid any swaying motion to assist
- Don’t forget the lower body alignment as well!
Now Test Yourself:
Level 2 Anatomy & Physiology Mock Questions below:
[NOTE: The answers are below the 3rd question]
QUESTION 1: What is the prime mover in the Lat Pull down?
A. Biceps
B. Latissimus Dorsi
C. Rhomboids
D. Trapezius
QUESTION 2: What is the antagonist muscle to the Latissimus Dorsi?
A. Deltoids
B. Pectorals
C. Abdominals
D. Biceps
QUESTION 3: Which joint action occurs at the shoulder during the concentric phase of the lat pull down?
A. Lateral Flexion
B. Flexion
C. Adduction
D. Abduction
Answers:
Question 1= B, Question 2 = A, Question 3 = C
If you want more mock questions like this, then you can download more Free Mock Questions: DOWNLOAD NOW
Keep it simple and structured
Avoid the temptation to overcomplicate your planning and instructing, a simple and structured session is often more effective than an overcomplicated mix-match of exercises.
Our FIT-Progressions online programme details session structure, warm-ups, cool downs and how to plan for each component of fitness in order to get the best client results. Plus, how to coach your client’s to achieve their goals and improve performance.
Plus you learn how to piece it all together for your L3 Personal Trainer Case study and accelerate your client journey so you can be an outstanding FITPRO.
>>>> Join us for FIT-Progressions here

Become a knowledgeable and confident FITPRO, with a clear strategy to get results with your clients every time.
There’s no more self-doubt. There’s no more guessing what to plan or how to get client results. FIT-Progressions has 8 modules and 18 video tutorials that guide you through every stage of your Level 3 Personal Trainer case study, and how to work with clients effectively.
This is for you if you’re…
- struggling to complete your coursework for PT, Yoga, or Pilates
- a newly qualified FITPRO that feels stuck or overwhelmed
- unsure where to start when planning a client session
- worrying about applying your course knowledge with a real client
- doubting you could get results and lack structure to client packages
- anxious and confused about how to get found and get busy
Click the link to find out more and join us:
https://courses.parallelcoaching.co.uk/products/fit-progressions/
Dedicated to More
Hayley “Lat Pull Down Technique” Bergman
Parallel Coaching
P.S. You can also find us on the following platforms:
Instagram: https://www.instagram.com/parallelcoaching
Facebook: https://www.facebook.com/ParallelCoaching
Twitter: https://twitter.com/ParallelCoach
YouTube: http://bit.ly/2F1Z1bs
Read more Planning blogs: HERE