On practical assessment days, we quite often see the press up being performed wrong! Here’s what to look out for and how to correct your client’s Press Up technique!
It is important that you demonstrate the correct technique to your clients, and are able to correct them.
This is an important assessment criteria on Level 2 and Level 3 Practical Assessments. Although Press Ups are seen to be an easy and simple body weight exercise, this is one of the exercises that we see most commonly performed with poor technique.
In this blog you’ll learn how to correct your client’s Press Up technique:
First Up, PRESS PLAY
and take notes as you go through today’s quick tutorial on how to correct your client’s press up technique. Then scroll to the bottom of this blog to test your knowledge with three quiz questions!
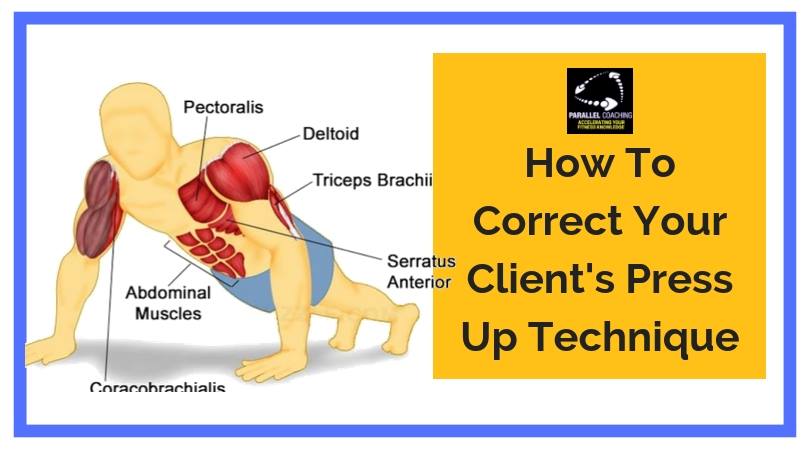
The Press Up
The Press Up is a foundational Bodyweight exercise, suitable for most fitness clients; here’s a summary of the Press Up
- JOINT ACTIONS: Scapula Protraction, Horizontal Flexion of the Shoulder, Elbow Extension. These are the main joint actions that occur in the concentric phase (lifting phase) of the press up.
- PRIME MOVER: Pectoralis Major. Your pecs are essentially your chest muscles. As you lower yourself toward the floor (eccentric phase), your pecs lengthen and control the speed of your descent. As you push back up again (concentric phase), they shorten.
- SYNERGISTS: The Triceps Brachii, Anterior Deltoids, and Serratus Anterior. They assist with elbow extension, shoulder flexion, and Scapula Protraction respectively.
- FIXATORS: Rotator Cuff Muscles, Core Muscles, Latissimus Dorsi, Quadriceps. These muscles hold joints stable throughout the whole body, crossing the shoulder, spine, hip, and knee, maintaining good technique.
- ANTAGONIST: Trapezius, Posterior Deltoids and Rhomboids. These muscles relax in when the prime mover (and synergist) muscles contracts, this is called reciprocal inhibition.
Key Fact = The Prime Mover of the Press Up is the Pectoralis Major, and The Triceps Brachii, Anterior Deltoids and Serratus Anterior assist the movement.
How to teach a Press-Up:
Get your client to lie prone on the floor (on stomach) and then place their hands either side of the chest, at nipple-height, with hands pointing forwards
Ask your client to tuck their feet underneath them, and lift up so the only points of contact with the floor are the hands and feet. Typically, the wider distance your feet are from each other, the more stable you’ll be for your push-ups.
Try to imagine a line running from the top of their head down through the heels. Their bum shouldn’t be sticking up in the air, nor should your hips be dipping close to the ground. Your head should be looking slightly ahead of you, not straight down. Looking up will help keep your body in proper alignment.
With the arms straight, glutes clenched, and core engaged, steadily lower your body until the chest is approx 2 inches from the floor.
Pause slightly at the bottom and then push back up until you arrive back to your starting position.
How To Correct Your Client’s Press-Up Technique:
The hand position makes a huge difference in the ability to engage the prime mover (Pectoralis Major) effectively.
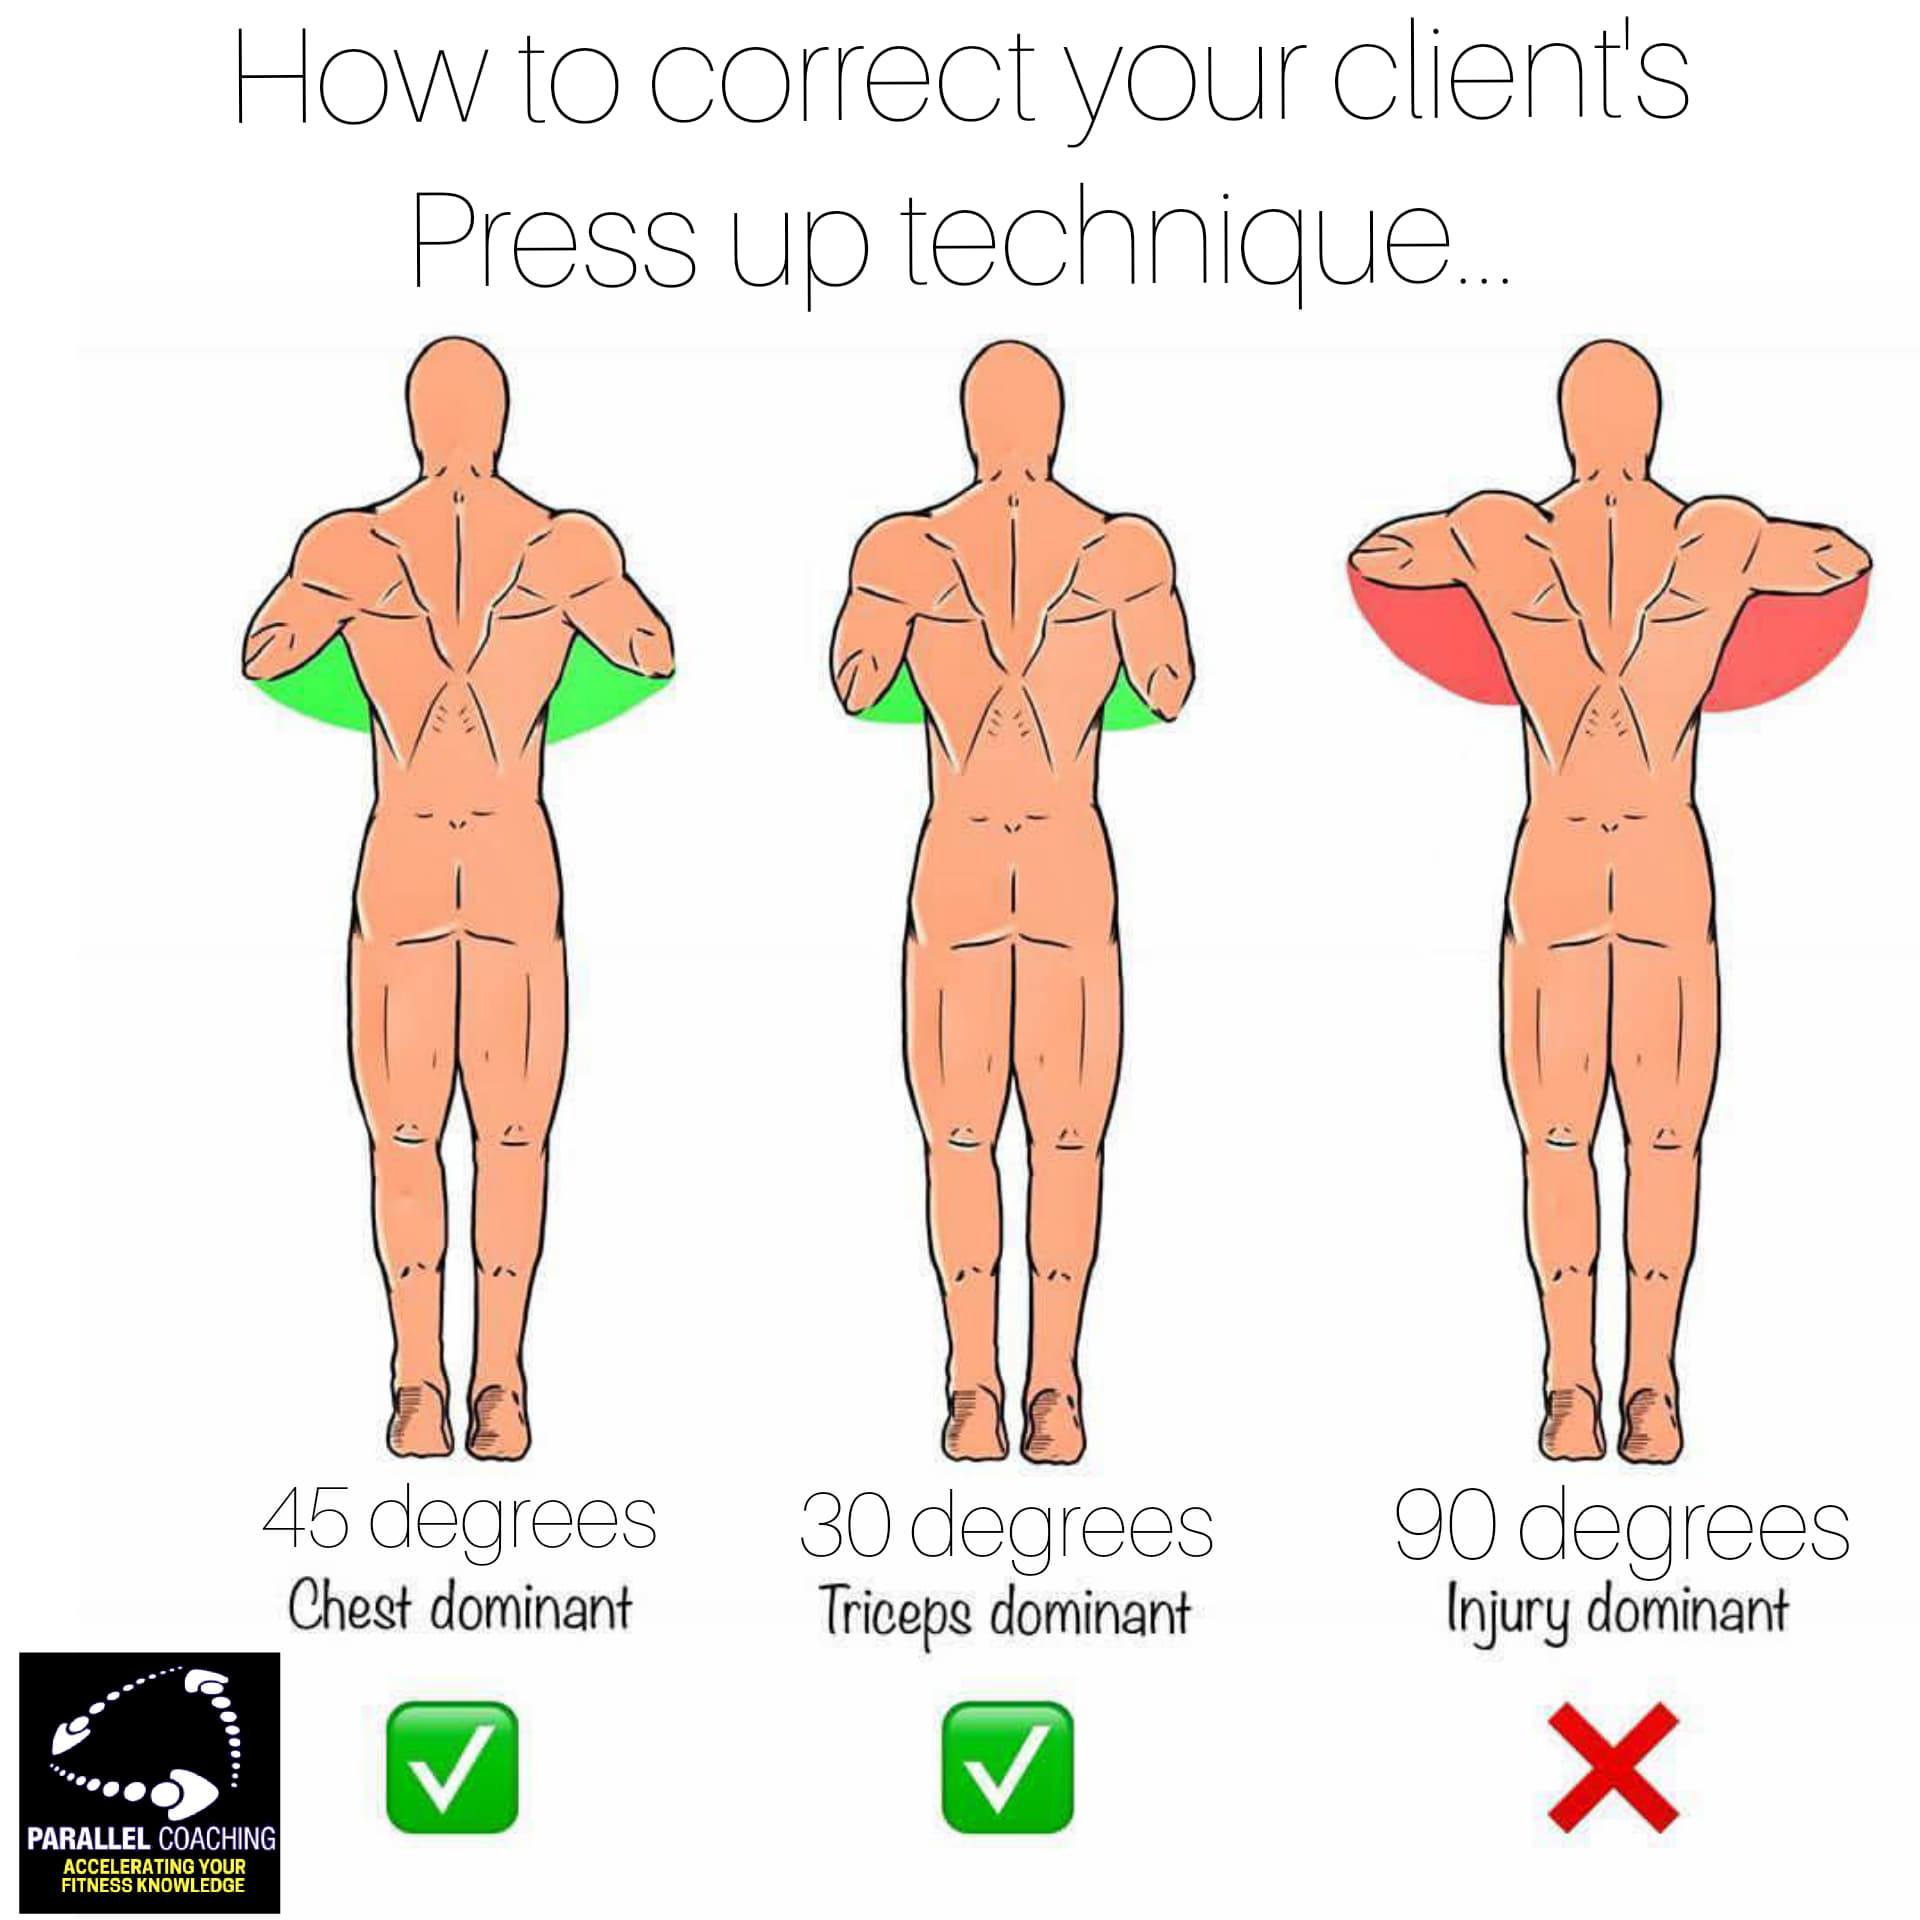
Poor Technique = 90 degrees:
A lot of clients point their hands inwards, which forces the elbows to go out to the side of the body. This loads the shoulder joint incorrectly and cause injury and strain to the rotator cuff muscles. It also causes the bulk of the power to come from the Anterior deltoids rather than the pectoralis major, therefore making it ineffective.
You can identify this incorrect technique by looking from above your client. Look for the angle created between the upper arm and the torso, the incorrect technique will be close to 90 degrees.
Good Technique = 45 degrees:
To correct your client ask them to point their hands forward and place the chest between the hands when lowering to the floor.
The arms should be at 45 degrees to the body, rather than 90 degrees. This will allow for much more scapula retraction during the Eccentric phase and increase the engagement of the Pectoralis Major.
Your client may find it hard to do it properly at first, so be ready with regressions like a 3/4 press up, box press up or wall press up.
“Key Fact” = Ensure your client’s arms are 45 degrees from the body (when viewed from above) as this will engage the Pectoralis Major the most.
To test your knowledge scroll to the bottom of this blog for 3 Quiz Questions all about the Press Up!
The fastest way to accelerate your learning and revision of the muscles and joint actions, is to check out the Muscle Memory Sprint. Here all 50 muscles are presented on clear flashcards. I’ve also packed in 5 BONUSES for you as well, click the link below: The Muscle Memory Flashcards
Now Test Your Knowledge: Press Up Technique Quiz Questions:
[NOTE: The answers are below the 3rd question]
QUESTION 1: What is the Prime Mover in a Press Up?
A. Anterior Deltoid
B. Biceps Brachii
C. Triceps Brachii
D. Pectoralis Major
QUESTION 2: During the Concentric phase of the Press Up what joint action occurs at the Shoulder Girdle?
A. Scapula Retraction
B. Scapula Protraction
C. Flexion
D. Lateral Flexion
QUESTION 3: Which of the following a fixator during the Press Up?
A. Triceps Brachii
B. Rotator Cuff Muscles
C. Rhomboids
D. Pectoralis Major
Answers:
Question 1= D, Question 2 = B, Question 3 = B
If you want more mock questions like this, then you can download more Free Mock Questions: DOWNLOAD NOW
Keep it simple and structured
Avoid the temptation to overcomplicate your planning and instructing, a simple and structured session is often more effective than an overcomplicated mix-match of exercises.
Our FIT-Progressions online programme details session structure, warm-ups, cool-downs and how to plan for each component of fitness in order to get the best client results. Plus, how to coach your client’s to achieve their goals and improve performance.
Plus you learn how to piece it all together for your L3 Personal Trainer Case study and accelerate your client journey so you can be an outstanding FITPRO.
>>>> Join us for FIT-Progressions here

Become a knowledgeable and confident FITPRO, with a clear strategy to get results with your clients every time.
There’s no more self-doubt. There’s no more guessing what to plan or how to get client results. FIT-Progressions has 8 modules and 18 video tutorials that guide you through every stage of your Level 3 Personal Trainer case study, and how to work with clients effectively.
This is for you if you’re…
- struggling to complete your coursework for PT, Yoga, or Pilates
- a newly qualified FITPRO that feels stuck or overwhelmed
- unsure where to start when planning a client session
- worrying about applying your course knowledge with a real client
- doubting you could get results and lack structure to client packages
- anxious and confused about how to get found and get busy
Click the link to find out more and join us:
https://courses.parallelcoaching.co.uk/products/fit-progressions/
Dedicated to More
Hayley “How To Correct Your Client’s Press Up Technique” Bergman
Parallel Coaching
P.S. You can also find us on the following platforms:
Instagram: https://www.instagram.com/parallelcoaching
Facebook: https://www.facebook.com/ParallelCoaching
Twitter: https://twitter.com/ParallelCoach
YouTube: http://bit.ly/2F1Z1bs
Read more Planning blogs: HERE